
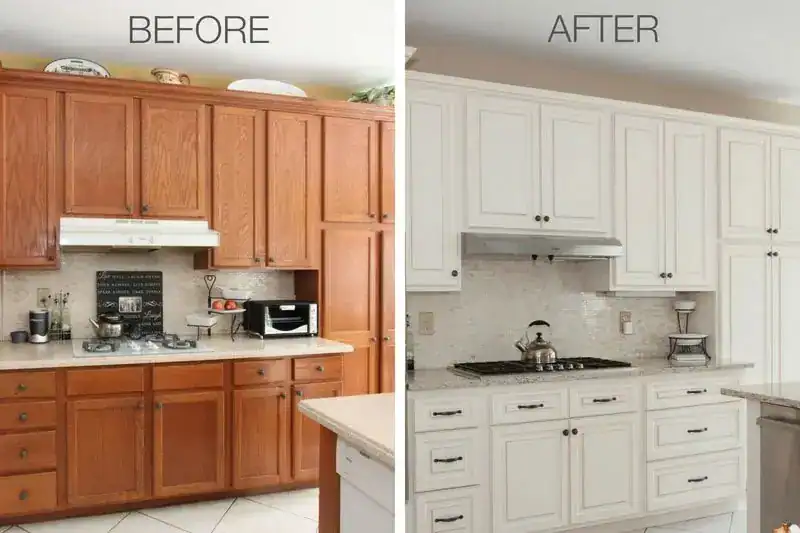
Kitchen Cabinet Refinishers: What Homeowners Should Know Before Replacing Their Cabinets
Have you ever owned a cabinet that is structurally solid, but visually outdated? This is the time kitchen cabinet refinishers
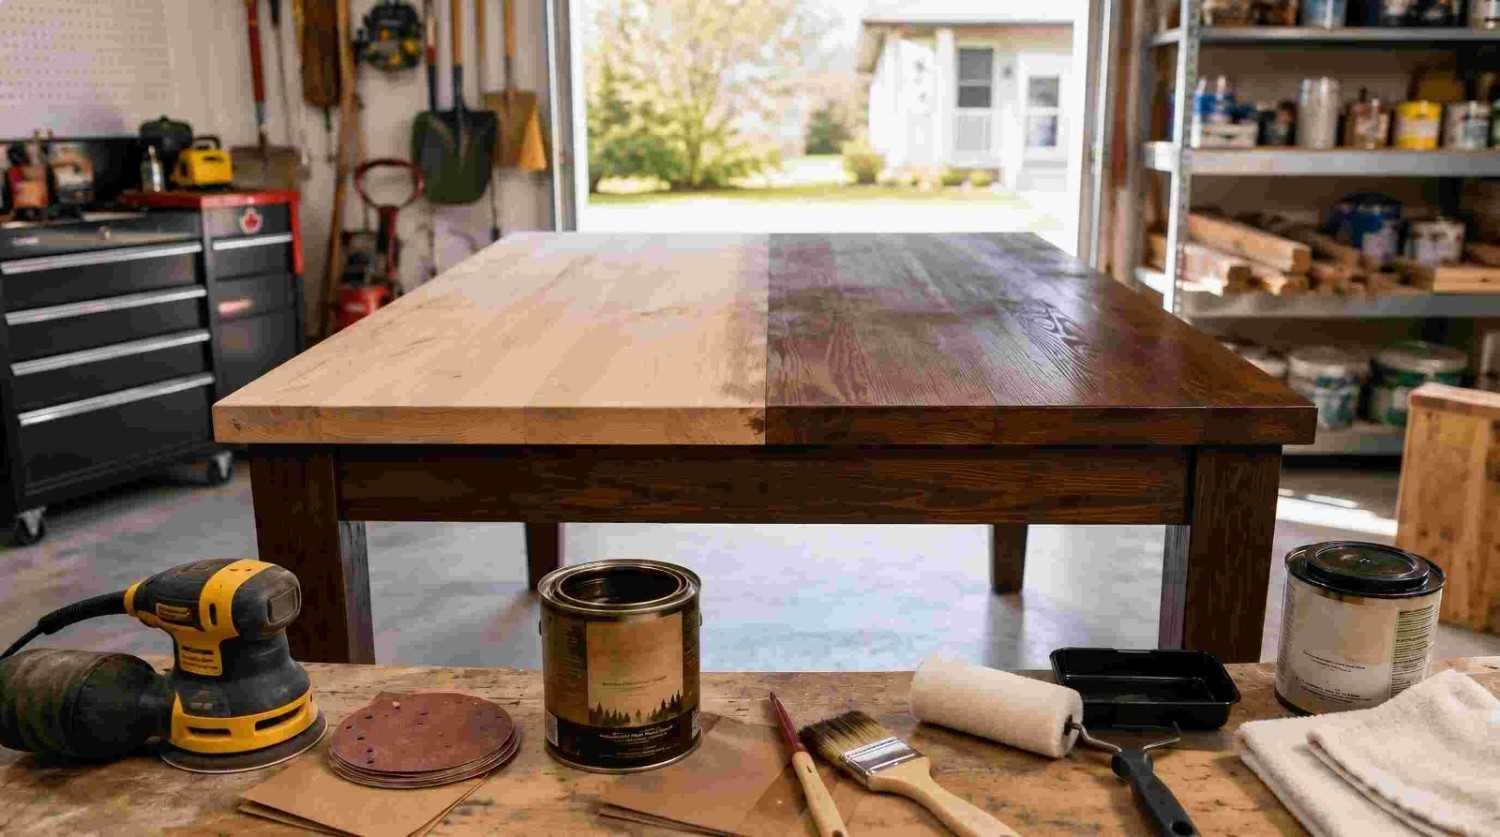
Your dining table tells a story. Every scratch from holiday dinners, every water ring from morning coffee, every crayon mark from the kids — they all add character. But when that character starts looking more like neglect, it’s time for a refresh.
Refinishing your dining table is one of the most rewarding DIY projects you can tackle. Instead of spending $1,200 to $5,000+ CAD on a new solid wood dining table, you can restore your existing one — or a beautiful thrift store find — for under $150–250 CAD in materials.
Whether you’re in a garage in Calgary, a condo balcony in Toronto, or a workshop in Montreal, this guide walks you through every step of refinishing your dining table the right way, with Canadian-specific tips, products, and suppliers.
Before you grab the sandpaper, take a moment to evaluate whether your table is a good candidate for refinishing.
Pro Tip: To check if your table is solid wood, look at the edges and underneath. Solid wood shows consistent grain patterns on edges. Veneer will show a thin layer on top with different material underneath. You can also tap the surface — solid wood sounds solid and resonant, while veneer over particle board sounds hollow.
If your table has structural issues or you’re dealing with a particularly valuable antique, consider consulting with professional wood refinishing experts before diving in yourself.
Here’s your complete shopping list. All of these items are readily available at Canadian retailers like Home Depot Canada, Canadian Tire, RONA, and Lee Valley Tools.
| Tool | Approximate Cost (CAD) | Notes |
| Random orbital sander | $60–$150 | Worth the investment; hand sanding alone is exhausting |
| Sanding blocks | $5–$15 | For edges and detail work |
| Sandpaper (80, 120, 150, 220 grit) | $15–$30 | Buy more than you think you’ll need |
| Paintbrush (natural bristle) | $8–$15 | For stain application |
| Foam brushes or foam roller | $5–$10 | For topcoat application |
| Tack cloth | $3–$8 | Essential for removing sanding dust |
| Drop cloths | $10–$20 | Protect your floor/garage |
| Painter’s tape | $5–$10 | For masking areas you don’t want stained |
| Plastic scraper | $3–$8 | For removing old stripper |
| Steel wool (0000 grade) | $5–$10 | For between-coat smoothing |
| Safety glasses | $5–$15 | Non-negotiable |
| Respirator mask (N95 or chemical cartridge) | $15–$40 | Essential, especially with strippers |
| Rubber/nitrile gloves | $10–$15 | Chemical-resistant |
| Material | Approximate Cost (CAD) | Recommended Options |
| Chemical stripper | $15–$35 | Citristrip (low odour) or methylene chloride–free options |
| Wood stain | $15–$40 | Varathane, Minwax, or General Finishes |
| Polyurethane or topcoat | $20–$50 | Oil-based or water-based |
| Wood filler/putty | $5–$15 | Match to your chosen stain colour |
| Pre-stain wood conditioner | $10–$20 | Critical for pine, maple, birch |
| Mineral spirits | $10–$20 | For cleanup (oil-based products) |
| Denatured alcohol | $10–$15 | For surface prep |
Shopping Tip: Canadian Tire frequently runs sales on sanding and finishing supplies. Lee Valley Tools (levalleytools.com) offers premium options and expert advice. Home Depot Canada and RONA have the broadest in-store selection. Check Flipp for weekly flyer deals.
Note: Prices mentioned are approximate and may vary depending on project requirements, materials, location, or service scope.
Proper preparation prevents 90% of refinishing headaches. Skip this step, and you’ll regret it.
Ideal: A well-ventilated garage, workshop, or covered outdoor area.
Important for Canadian DIYers:
Canadian Regulation Note: Canada has stricter VOC regulations than many US states. Look for products labelled “low-VOC” or “compliant with Canadian VOC regulations.” Methylene chloride–based strippers have been increasingly restricted. Citrus-based strippers like Citristrip are a popular, safer alternative widely available at Canadian retailers. Health Canada provides guidelines on safe use of paint strippers and chemical products.
Stripping removes the old finish (varnish, polyurethane, lacquer, or paint) to expose bare wood. This is the messiest step, but it’s crucial for a professional-looking result.
Strip when:
Sand only when:
Safety First: Always wear chemical-resistant gloves, safety glasses, and a respirator. Work in a well-ventilated area. Dispose of chemical waste according to your local municipal guidelines. In most Canadian cities, chemical strippers are classified as household hazardous waste — don’t pour them down the drain. Check your municipality’s hazardous waste disposal program. The Government of Canada’s Chemical Substances page offers safety guidelines.
For large or complicated projects, stripping can be done by professionals who have commercial-grade equipment and ventilation. Renowned Finishing offers furniture stripping and refinishing services for those who want expert-level results without the DIY mess.
Sanding is where your table goes from “maybe this was a mistake” to “oh wow, look at that grain.” It’s the most important step for achieving a smooth, professional finish.
Always sand with the grain. This is the golden rule. Sanding across the grain creates scratches that will be magnified by stain.
Progressive gritting system:
After your final 220-grit pass:
This “raise the grain” technique prevents the first coat of stain or finish from causing the wood fibres to swell and feel rough.
This is the transformative step — where you choose the personality of your dining table. Stain enhances the natural wood grain while adding colour and depth.
Popular stain colours for dining tables in Canadian homes:
Test First! Always test your chosen stain on a hidden area of the table (underside) or on a piece of scrap wood of the same species. Stain looks different on every type of wood. What looks gorgeous on the can may look completely different on your table.
| Type | Pros | Cons | Best For |
| Oil-based (Minwax, Varathane) | Deep colour penetration, long working time, forgiving for beginners | Longer dry time (8–12 hours), higher VOC, cleanup requires mineral spirits | Most hardwoods, best overall results |
| Water-based | Low VOC, fast drying (2–4 hours), easy soap-and-water cleanup | Can raise grain, shorter working time, may appear less rich | Well-ventilated spaces, eco-conscious users |
| Gel stain | Won’t drip or run, great for vertical surfaces (legs), more even coverage on blotchy woods | Sits on top rather than penetrating, fewer colour options | Pine, cherry, birch, maple (blotch-prone woods) |
Yes, if your table is made of:
These “blotch-prone” woods absorb stain unevenly, creating dark splotches and streaks. Pre-stain conditioner partially seals the wood so stain absorbs more uniformly.
Apply pre-stain conditioner according to product directions (usually 15 minutes before staining). Don’t let it dry too long, or it won’t be effective.
Important: Stain alone does NOT protect your table. It only adds colour. You must apply a topcoat (polyurethane or similar) for protection. Think of stain as makeup and topcoat as sunscreen — you need both.
For expert guidance on choosing the right stain for your specific wood species, check out Renowned Finishing’s wood refinishing services. Their team works with all wood types and can recommend the perfect finish for your piece.
The topcoat is what protects your dining table from daily life — spills, heat, scratches, and wear. This is not the place to cut corners. A proper topcoat is the difference between a refinishing job that lasts 2 years and one that lasts 20.
| Finish | Durability | Look | Dry Time | Best For |
| Oil-based polyurethane | Excellent | Warm, amber tone that deepens over time | 6–12 hours between coats | High-use dining tables, traditional look |
| Water-based polyurethane | Very Good | Crystal clear, won’t yellow | 2–4 hours between coats | Light-coloured stains, modern look, low-VOC preference |
| Wipe-on polyurethane | Good | Thin, natural feel | 2–3 hours between coats | Beginners, less room for error |
| Lacquer | Excellent | Professional, glass-like | Very fast (30 min) | Experienced users, spray application |
| Tung oil / Danish oil | Moderate | Natural, matte, “in the wood” feel | 24+ hours between coats | Rustic/natural aesthetic, low-traffic surfaces |
| Rubio Monocoat | Very Good | Ultra-matte, natural | 24–36 hours cure | Modern, Scandinavian look, eco-friendly |
For dining tables, oil-based or water-based polyurethane is the standard recommendation. It provides the best balance of durability, ease of application, and protection.
There’s an important distinction:
Not every refinishing project requires full chemical stripping. If your table’s existing finish is in reasonable condition — no peeling, flaking, or thick buildup — you may be able to refinish without stripping. This saves significant time, mess, and chemical exposure.
Products like Krud Kutter Gloss-Off or 3M Liquid Sandpaper chemically degloss the surface without sanding. This is great for detailed or carved surfaces where sanding is impractical.
This approach is ideal for a dining table that just needs a refresh, not a full transformation. If you’re unsure whether your table needs full stripping or just a recoat, Renowned Finishing can assess your piece and recommend the best approach.
Different wood species behave differently during refinishing. Here’s what you need to know about the most common types found in Canadian dining tables:
For specialized wood types or antique pieces requiring expert handling, Renowned Finishing provides professional wood restoration services with experience across all species and eras.
Learn from other people’s dining table disasters:
If the old finish is thick or damaged, sanding alone won’t give you a clean surface. The stain will absorb unevenly, and the new finish won’t adhere properly. Don’t take shortcuts on this step.
The most common DIY mistake. If you can still see shiny spots from the old finish after sanding, you’re not done. The entire surface should be consistently matte and smooth.
Cross-grain sanding scratches are invisible on bare wood but become glaringly obvious once stain is applied. Always sand with the grain.
The difference between conditioned and unconditioned pine is dramatic. Don’t skip this on pine, maple, birch, cherry, or poplar.
Stain colours on the can or swatch card look nothing like they do on your specific table. Always test on the underside or scrap wood of the same species.
More stain does not equal more colour. If you want darker colour, apply multiple thin coats rather than one thick, goopy coat. Excess stains that aren’t wiped off become sticky and won’t dry.
Thick coats of polyurethane run, sag, drip, and take forever to dry. Multiple thin coats always beat one thick coat. Patience here pays off enormously.
Each coat needs a tooth for the next coat to adhere. Skipping this results in peeling and delamination over time.
Too cold, too humid, too dusty — environmental conditions directly affect your finish quality. According to This Old House, maintaining consistent temperature and low humidity is critical for successful wood finishing.
The finish may feel dry, but it’s not cured. Using the table heavily before the 30-day curing period invites dents, water marks, and rings that become permanent.
Here’s a realistic budget for refinishing a standard 6-seater dining table in Canada (2025 prices):
| Item | Cost (CAD) |
| Chemical stripper | $15–$35 |
| Sandpaper (various grits) | $15–$30 |
| Pre-stain conditioner | $10–$20 |
| Wood stain (1 quart) | $15–$40 |
| Polyurethane (1 quart) | $20–$50 |
| Brushes, foam applicators | $10–$25 |
| Tack cloth, steel wool | $10–$15 |
| Drop cloths | $10–$20 |
| Safety equipment (gloves, mask, glasses) | $20–$50 |
| Wood filler | $5–$15 |
| Mineral spirits | $10–$20 |
| TOTAL (materials only) | $140–$320 |
| Random orbital sander (if buying) | $60–$150 |
| TOTAL (including sander) | $200–$470 |
Note: Prices mentioned are approximate and may vary depending on project requirements, materials, location, or service scope.
Professional dining table refinishing in Canada typically ranges from $300 to $1,200+ CAD, depending on:
While DIY saves money, professional refinishing provides guaranteed results, proper equipment, and expertise with difficult projects. Get a quote from Renowned Finishing to compare costs for your specific project.
| Option | Cost (CAD) |
| DIY refinish | $150–$470 |
| Professional refinish | $300–$1,200 |
| New solid wood dining table (quality) | $1,000–$5,000+ |
| New veneer/particle board table | $300–$800 |
Refinishing a solid wood table is almost always more cost-effective than replacing it with a comparable-quality new piece. Plus, you get the satisfaction of preserving a quality piece of furniture rather than sending it to landfill — an increasingly important consideration for environmentally conscious Canadians.
Note: Prices mentioned are approximate and may vary depending on project requirements, materials, location, or service scope.
✅ Your table is a common wood species in good structural condition
✅ You enjoy hands-on projects and have patience for multi-day work
✅ You have a suitable workspace (ventilated garage or outdoor area)
✅ You’re comfortable with power tools and chemical products
✅ The table has primarily surface-level damage
✅ You want to save money and don’t mind imperfections
✅ It’s a warm-weather season (spring through fall in most of Canada)
✅ The table is a valuable antique or heirloom piece
✅ The wood species is exotic or unfamiliar
✅ The table has thin veneer (one wrong sanding pass and it’s ruined)
✅ You want a flawless, showroom-quality finish
✅ The table has structural repairs needed (loose joints, cracks, warping)
✅ You don’t have space or time for a multi-day project
✅ You’re working with intricate carvings, inlays, or specialty hardware
✅ The table requires colour matching to other furniture
Professional refinishers have commercial-grade equipment (spray systems, dust-free booths, high-quality products) that simply can’t be replicated in a home workshop. For important pieces, the investment in professional work pays for itself in longevity and quality.
Renowned Finishing specializes in furniture refinishing and can handle everything from casual kitchen tables to prized antiques. Their team understands Canadian wood species, finishes, and the unique challenges of our climate.
Canada’s climate creates unique challenges and opportunities for furniture refinishing:
Many Canadians are increasingly interested in sustainable, low-toxicity refinishing. Here are some options:
Properly dispose of all refinishing chemicals, stain-soaked rags (fire hazard!), and used stripper. In Canada:
The Government of Canada provides resources on safe disposal of household chemicals.
Plan for 3–5 days of active work spread over 7–10 days total (including drying time between coats). A basic scuff-and-recoat can be done in 2–3 days.
Carefully, yes — but with significant limitations. You can lightly sand with 220-grit and apply a new topcoat. You cannot aggressively strip or sand, as veneer is typically only 1/32″ to 1/8″ thick. One pass too many with a sander and you’ll cut through to the substrate beneath. When in doubt, consult a professional.
Oil-based polyurethane (3–4 coats) remains the gold standard for durability on dining tables. Water-based polyurethane is a close second with the advantage of not yellowing over time. For a natural look with good durability, Rubio Monocoat is excellent.
Yes, but it requires thorough stripping to remove all old stains. Some darker stains penetrate deeply into the wood grain and can be very difficult to remove completely. Multiple stripping sessions and aggressive sanding may be needed. Some colour residue may remain in the grain — this is normal.
For a dining table, yes. This surface endures daily abuse — hot dishes, spills, elbows, plates, cleaning products. Three coats is minimum; four is ideal. Each coat adds durability and protection.
Yes, chalk paint (like Annie Sloan or Fusion Mineral Paint) is popular for dining tables, especially for farmhouse and shabby chic styles. However, painted tables require a durable topcoat — wax alone isn’t sufficient for a dining table. Use polycrylic or water-based polyurethane over chalk paint for durability.
Canadian sources for solid wood dining tables that need refinishing:
Refinishing a dining table is more than a home improvement project — it’s an act of preservation. Every solid wood table has decades of life left in it, regardless of how rough it looks on the surface. By refinishing rather than replacing, you’re saving money, reducing waste, and creating something uniquely yours.
The process requires patience, attention to detail, and a willingness to get your hands dirty. But the moment you sit down to dinner at your freshly refinished table — seeing the rich wood grain, feeling the glass-smooth surface, knowing you did it yourself — that’s a feeling no furniture store purchase can match.
Whether you tackle this project yourself or entrust it to professionals, the result is the same: a beautiful, durable dining table that will serve your family for years to come.
Going DIY? Bookmark this guide and start with Step 1 this weekend. Share your before-and-after photos — we’d love to see your results!
Want professional results? Contact Renowned Finishing for a free consultation. Their experienced team handles everything from everyday dining tables to treasured antiques, delivering showroom-quality finishes that last.
Explore more refinishing resources:
Disclaimer: This content is intended for learning purposes only. Some information may not be fully accurate or up to date. Please review and make any necessary adjustments if you notice anything inappropriate or incorrect.
Have you ever owned a cabinet that is structurally solid, but visually outdated? This is the time kitchen cabinet refinishers

A furniture repair store is the ultimate destination for your wobbly chair and damaged couch. You might be thinking of

Don’t replace your beloved pieces, restore them with care and craftsmanship.